|
|
Post by WDot on Jul 18, 2006 21:24:37 GMT 10
If you're new to hoaxing, or are finding that your hoaxes aren't up to snuff, read this to discover a few interesting things to consider. DON'T FEEL YOU NEED TO READ THIS WHOLE THING, just skip down to what you need work on. I've discovered that there are way too many stickies on the hoaxing page. To remedy this, I'm putting all these tutorials and important notices into one topic so that the space can be put toward more important things. Like not having hoax topics zip off the front page so fast. =P Table of Contents: (now clickable and credited links to individual posts in the thread! - Matt)Screen Proportions by SonicLoverHoaxing in Paint by TenebraisRetexturing in Paint by DoomsdayRetexturing: Everybody Else (Images broken) by NiteBox Art hoaxing by Ashura and/or Kcan3D Hoaxes by EarlBox Lettering by SonicLoverRating Hoaxes by Tenebrais with notes from Matt_TYOne last thing: If any of you guys who made a tutorial notice a problem, feel free to let me know. All I did was copy and paste and then give credit where credit is due. =P |
|
|
|
Post by WDot on Jul 18, 2006 21:25:32 GMT 10
SCREEN PROPORTIONS:
After witnessing an epidemic of low-quality hoaxes with bad dimensions, I have decided to make this topic. If you're going to make a hoax, make sure its dimensions are correct for the system you're making it for. Below are the actual screen sizes (in pixels, of course) for specific game systems. Please make sure the pixel dimensions of your image match one of the following:
Genesis: 320 pixels wide, 224 pixels tall
Game Gear: 160 pixels by 144 pixels
Master System: 248 by 192
Neo Geo Pocket Color: 160 by 152
Game Boy Advance: 240 by 160
Nintendo DS: 256 by 192*
I will add more pixel listings as is necessary.
*The Nintendo DS has two screens. The numbers listed are the dimensions of one screen; the same dimensions apply for both screens. Some screenshots will show both screens in one image, separated by a black or white bar.
Originally by SonicLover
|
|
|
|
Post by WDot on Jul 18, 2006 21:27:06 GMT 10
HOAXING IN PAINT: Not everyone knows how to hoax. Fair enough, it can be tricky to an amateur, especially if said amateur doesn't know which programs to use. I myself started my hoaxing career with Microsoft Picture It... and frankly, the products were crap. Acceptable, but crap nonetheless. I'll have to redo them one of these days. However, few people can claim to not have the programs at all. Even Paint can be used to make decent hoaxes: It is not an excuse. To prove it, here is a simple step-by-step guide to hoaxing in Paint, which everyone should have. I have even made image examples. This guide assumes that you have a decent emulator. If you don't, get one. VisualBoy Advance is good for GBA hoaxes, which are generally easier to do due to the more cartoony graphics and the smaller size. The first thing a hoaxer should have is an idea. It can take a while to come up with an idea, so be patient: Inspiration will come. If you don't have a good idea, your hoaxes will never be great, even if they're implemented fantastically. Now, for the purpose of this guide, I'll say "Bugger that" and slap Cream into Sonic Advance 1. First, you need a background. I have taken out my emulator and started up Sa1. Note that I did not maximise the screen, as this stretches the image. I go into the first level for simplicity, make Sonic stand still, then remove the Object layer. I printscreen this and paste it into paint. I then cut out the actual emulator display and paste it into a new image.  I have not cropped the image to size as I will need the extra space. I have also changed the background colour to Yellow and filled it in accordingly, as I will not need that colour. White and black won't do because they are likely to be used in your hoax. I save the file, as I will need to start new ones to paste in more printscreens. My next step is to take the same picture, but this time with the Object layer so that I can use the HUD. I cut and paste the image into my hoax-in-progress. 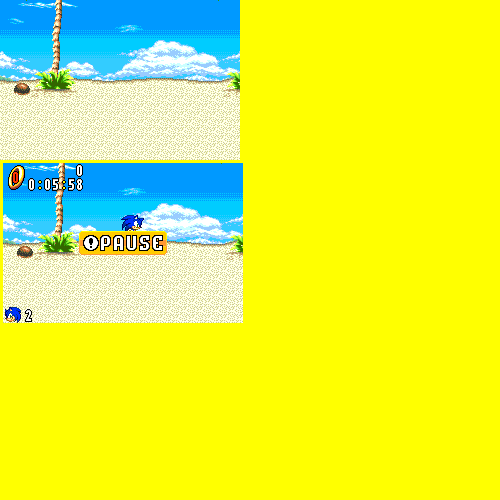 Lastly, I open up Sa2 and get a screen with Cream in it. I then Cut&Paste the image into my hoax as before. 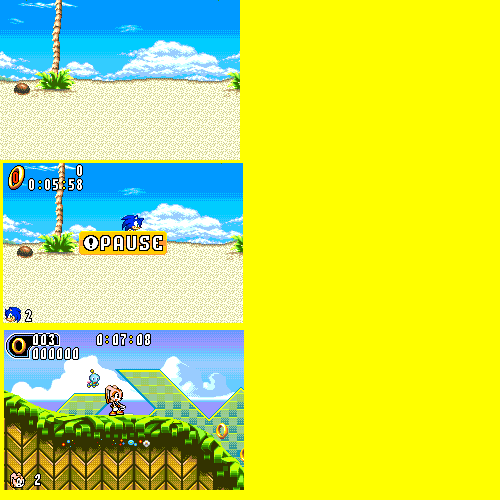 For the next step, I cut all the elements that I will need from the second and third screens then place them into the yellow space. 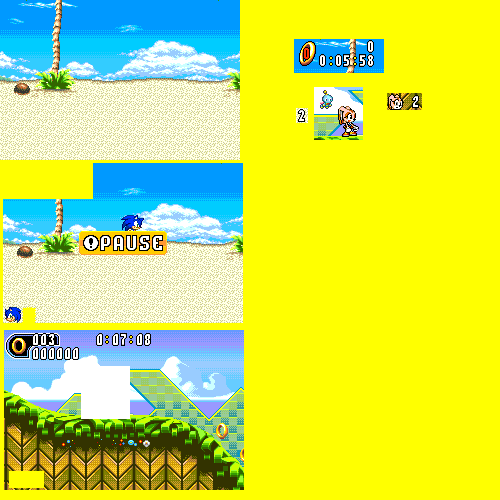 The Ring and Life counters don't need anything special done because I took both them and the background image from the same position in-game. Therefore, I can just place them onto my background, being careful to line them up neatly. 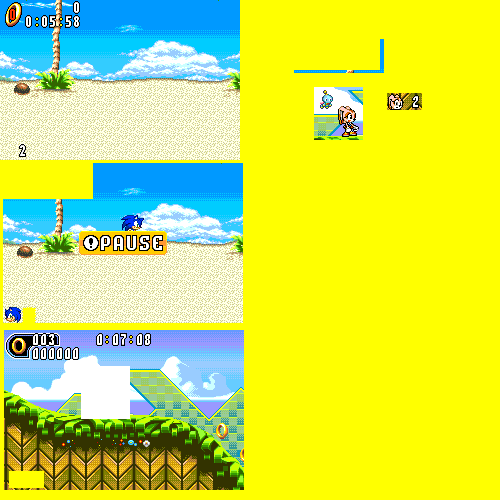 Pasting Cream on will be a little more complicated. For simplicity's sake, I have taken the smallest possible image from what I had salvaged from the third screenshot. 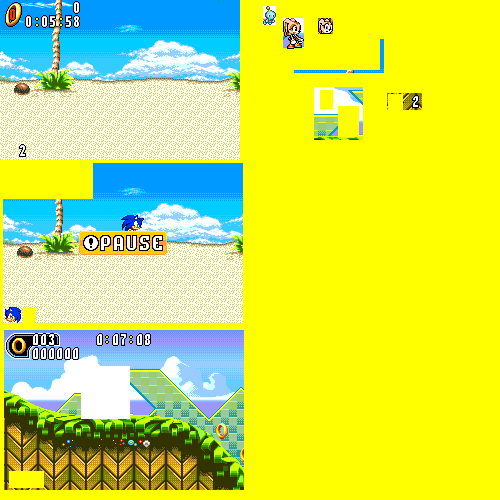 After that, I colour all the excess background into my background colour, in this case yellow. 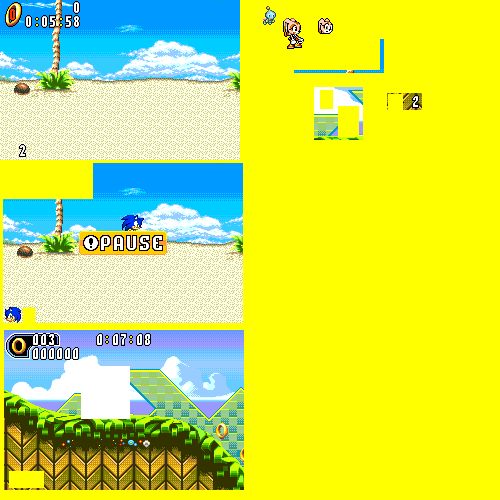 I now use the selection tool and use the option to remove the backgound colour from the selecting, ensuring that my background colour is still yellow. I place my sprites onto the hoax. 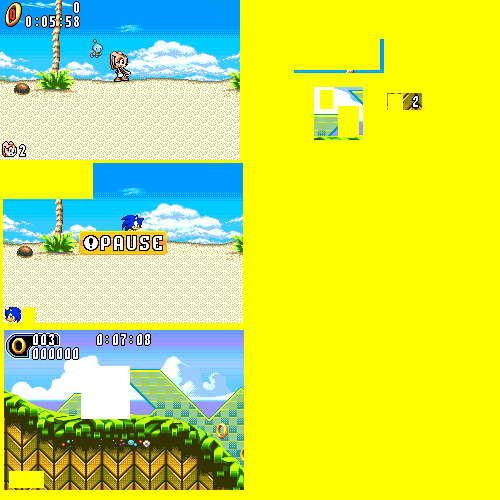 Lastly, I resize the image to fit neatly around the main hoax and remove all the litter. Paint doesn't stretch images into your resizing.  Simple sprite placing isn't all you can do in Paint. Let's say that cloud in the middle was giving me funny looks and I decided to remove it. I would take the eyedropper tool and click the main background colour. I then use the straight line tool (not the pencil, because if you slip with the pencil you'll have to redo your stroke) to colour in all parts that colour which should be. Use the rest of the background for reference. Repeat with any other background colour. The end result should look something like this:  It's not imaginative, but it looks decent, and I may have taught you something useful here. My work is done, now it's your turn. Use this advice to create better hoaxes, and remember that Paint is a powerful hoaxing tool in the right hands. -Original post by Tenebrais |
|
|
|
Post by WDot on Jul 18, 2006 21:28:19 GMT 10
RETEXTURING IN PAINT: ^_^ I've been asked how to do this alot. So here goes... Take a screenshot of each layer you want to retexture. This is so later your retexturing doesn't mingle with, say, Sonic's shoes.  Or, what I do is find a screenshot off the 'net. GHZ's Sonic Museum is a good place. I'll use my Angel Island Retextured hoax as an example.  Next, Google Image search for what you want. I find pretty much anything works provided you use the word "Texture" at the end. For this we'll use "grass texture" ...I can't remember which pattern I used so I can't show you. Let's take this one as an example though:  Next, enter Paint. Paste the screenshot(s) you're using (do at least two copies so if you make a mistake or don't like the result you can start fresh) and the texture. Paste the texture multiple times until it covers an area about the size of what you'll retexture: (I normally put the texture to the bottom-right hand corner, beside the image, but for space's sake I haven't here) 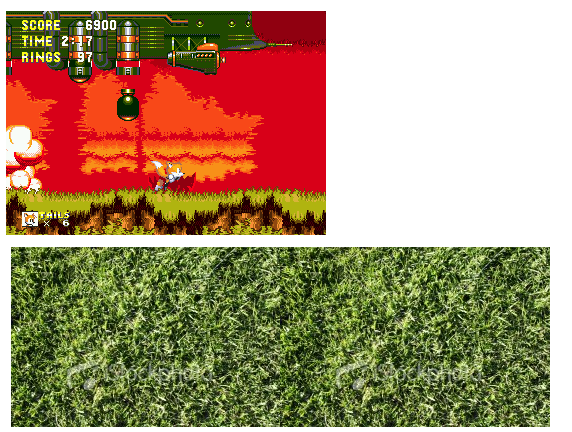 Zoom in on your image, using the magnifying glass. Using the eyedropper tool set the lightest shade of what you want to retexture to background colour (right-click). Next, select your image with the Rectangle Select tool (be sure to leave plenty of space around the image), and click-and-drag it over the texture, like so: 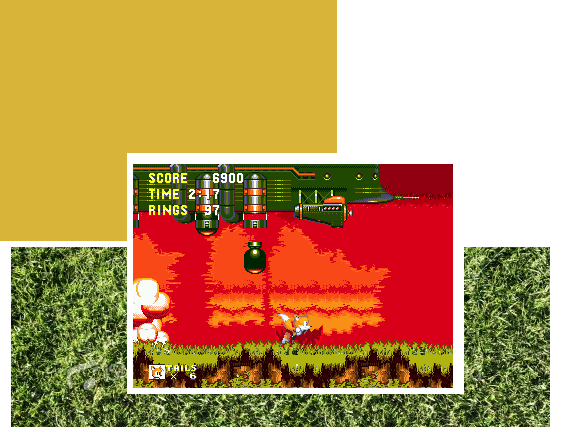 Using the rectangle select again, REselect the image [do not just press Copy] (it's easier the more space you left around the image), copy it (Ctrl+C), undo (Ctrl+Z), reselect your background colour to white (or whatever you had originally), delete the screenshot there and paste your new screenshot. It should now look like this: 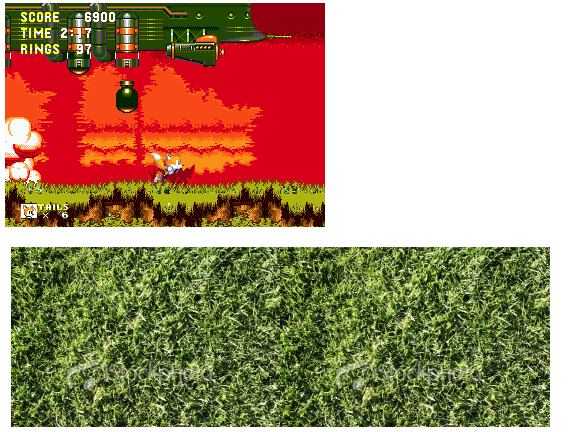 Now, select the texture, copy it, and paste it INTO POWERPOINT. This won't work if you have saved your picture so far (unless it's as a bitmap) so if you have already saved, copy the texture, paste it into a new Untitled paint file, re-copy it and THEN paste into Powerpoint: 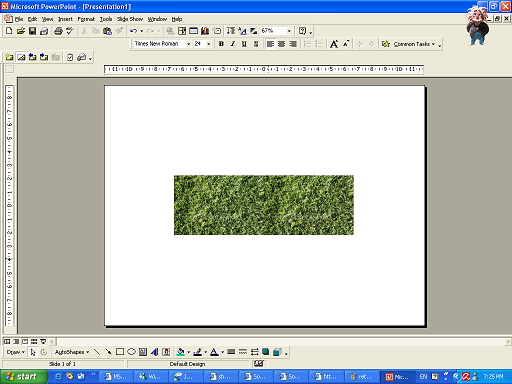 Once your image is in Powerpoint, right-click on the image and go to Format Picture. Now, click on the Picture tab... 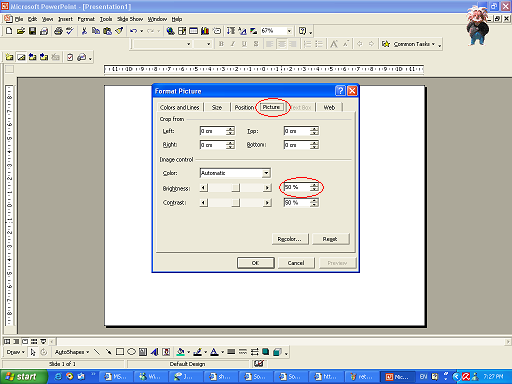 See that percentage bar next to Brightness? Click that and reduce it by 10%, in this case to 40%. Click OK. See how much darker your texture has gotten? Select this new image and paste it back into Paint. (Delete the old one if you want. I normally keep a bit of the old texture for reference.) Now, select the NEXT darkest shade of what you want to retexture and click-and-drag over the darker image, etc. Be sure to reduce the brightness by 10% each time, but on some occasions 5% or even 3% will do if retexturing many different shades. Different textures do different things. Once done with one texture, find another texture and repeat the process. For reference, here was my final product.  EDIT: You will have to use a few different textures for each hoax. Three is often the minimum, but for detail you may need five or more. Here's what I searched for to get the textures for this particular hoax: - grass texture - rock texture - green metal texture - red metal texture Happy retexturing! EDIT: Seems GHZ moved the day after I posted this...well, I've updated the picture to the new domain, so you can see it now  -Original post by Doomsday |
|
|
|
Post by WDot on Jul 18, 2006 21:29:47 GMT 10
|
|
|
|
Post by WDot on Jul 18, 2006 21:31:24 GMT 10
|
|
|
|
Post by WDot on Jul 18, 2006 21:32:24 GMT 10
3D HOAXES: Ok this is the tutorial thingy on how to make 3d hoaxes on paint. I will be making Hydro City from Sonic 3 for this. Now to begin the hoaxes should be in this style  not like this  . Now first start off by ripping all the layers of the shot like this.    And also take a complete shot like this.  Now I have the 3D pieces I use the most often right here for all of you.     To make the hoax start by taking the 3d pieces you need and put them together the right way. Like so.  After you've gotten that together take the second layer screen shot up there and use the sketch skew option and change skew vertical to 27 and place the piece like so.  Then take another single piece of 3d land  and use another part of the same layer shot like this piece  Make the 3d part.  And put it together. Add Sonic, a hud, the background, items, and its done!  TA DA!!! -Original post by Earl |
|
|
|
Post by WDot on Jul 18, 2006 21:33:51 GMT 10
BOX LETTERING: RPG-style dialogue is a great way to circumvent the "dialogue in a hoax" issue and the "no HUD" issue at the same time. Here's the way I do it- I did it this way in my "Iblis Trigger" hoax- and now you can do it too. STEP 1: Set up the image so that the background and all the sprites are the way you want them. Make sure the HUD and life icon are absent! STEP 2: Place a semi-transparent white rectangle like this over a portion of your screen, either at the top or the bottom. (How you go about this depends on your paint program; I use GIMP, so I just highlight the area with the square selection tool and then use the bucket fill with "Fill whole selection" on and transparency set to 50.) Some of you may want the far corners of the rectangle to meet the corners of the screen, but here I stopped short.  STEP 3 (optional, but recommended): On the left end of the box, place a mugshot of whoever's supposed to be speaking. The image I've used here is a story dialogue image from Sonic Battle.  STEP 4: Now for the text. Type it into the remaining space in the rectangle. I recommend a fixed-width font like Courier; it looks a little more RPGish. Don't forget to justify left, and save a little space in the lower right corner for Step 5!  STEP 5: Add something in the lower right corner of the rectangle that would indicate that it's time to scroll the text. The most common choices for this are an arrow pointing down or right or an A button, but you can use just about anything as long as it makes sense.  You're done! You've given dialogue and non-HUDity to a hoax in such a way that it doesn't look like a single-panel sprite comic! RPG-style dialogue is the way to go! -Original post by SonicLover |
|
|
|
Post by WDot on Jul 18, 2006 21:39:40 GMT 10
RATING HOAXES:
If you're not sure how to state your opinion of a hoax, or want to know how well you're doing based on others' opinions, here is a brief guide for it to replace the old thread that needed refinement.
When you criticise a hoax, first state everything that you find wrong with it, and how that can be improved if it isn't impled by the problem. (IE, saying "The text should be improved" would need explanation, but "There isn't an HUD" wouldn't).
After that, if you can, rate it with a number out of ten. This is roughly what that number should represent:
0: "Reconsider hoaxing at all."
1: "Terrible. You probably didn't even try."
2: "Your idea is terrible and your implementation is too.".
3: "Not good. Needs a lot of improvement, either the idea is terrible or the drawing is bad."
4: "Needs improvement. There are some gaping holes in the idea that need to be filled."
5: "Acceptable. Nothing noteworthy, but not intensely horrible."
6: "Well-implemented, but bad idea." (Or vice versa.)
7: "Could use improvements in implementation."
8: "Getting there. Not perfect, but good."
9: "Very good: there are few inconsistencies and they are not extremely noticeable."
10: "Perfect. I cannot find fault with it."
A terrible hoaxer would be getting scores in the range of 1 to 3. Such hoaxes will most likely not make it to the website. An average hoaxer will score 4s to 5s, and the hoaxes may make it to the site. A good hoaxer will score in the 6-8 range, and his/her hoaxes will almost certainly make it to the main site. An excellent hoaxer will get 9's and 10's, and may well gain hoax of the month (Because, let's face it, updates are never more than monthly).
Finally, note that these are guidelines, not rules. You are free to use a system of your own, provided your criticism goes beyond "OMG UR HOAX SUX OLOL". Also, if you're the hoaxer under scrutiny, don't lash out at bad reviews. Just because people think your hoaxes are bad doesn't mean they hate you.
Happy hoaxing!
-Original post by Tenebrais
Remember this doesn't actually prohibit you from saying "OMG UR HOAX SUX LOLOL", provided the following is true:
1) You say it in proper English. ("I'm sorry, but that hoax really does suck" rather than "OMG UR HOAX SUX LOLOL")
2) The hoax actually DOES suck. (I'd say, a 3 or below on Tene's scale.)
3) You give constructive criticism AS WELL. ("That hoax really does suck, because...")
4) You don't make it personal, for example by inviting the hoaxer to beat themselves about the head and body with a heavy club. The hoax sucks; the hoaxer doesn't (necessarily).
-Original post by Matt_TY
|
|
|
|
Post by soniclover on Jul 18, 2006 22:41:33 GMT 10
Why don't you just link to our topics?
|
|
|
|
Post by Kanye West on Jul 19, 2006 0:52:23 GMT 10
I think this is good and that all new hoaxers need to read this. Now whenever we get a n00b we just simply link here. Its much easier!
|
|
|
|
Post by Tené on Jul 19, 2006 2:33:53 GMT 10
WDot, coming up with this makes you the smartest guy in the universe ever.
|
|
Neo // Racing Stripe A/V
Person with Huge Amount of Posts
    Icky icky tang pang fang clang spang
87%
professional skunk
Posts: 1,614
|
Post by Neo // Racing Stripe A/V on Jul 19, 2006 23:47:43 GMT 10
Can't this just be put in a seperate forum/sub-forum? That could help..
I appreciate the effort, WDot.
|
|
|
|
Post by Tené on Jul 20, 2006 0:59:43 GMT 10
Yes, but then we'd have had to wait half a week for Matt to come online. Then half a year for him to decide it's a good idea. After all, it's not as though many tutorials/guidelines are made.
The one problem with this thread as it is is that it's quite limited to updatability. Unless, when we get more additions, we delete the comments and lock the thread, so that we can add more to the end.
|
|
|
|
Post by Max Firestorm on Jul 21, 2006 5:16:53 GMT 10
I agree with Tene. Nice one WDot
|
|